Showing posts with label Fall nail design. Show all posts

Friday, November 13, 2015

My #12 favorite fall polish for 2015...


With The Band was part of the Essie Fall Collection Leggy Legend that was released this year. It is a red polish that leans a little orange. The formula is very thick and creamy. You just need to make sure you don't load your brush up too much with this one. What's great about the thick formula though is that it makes it a OCW (One Coat Wonder)!


 This swatch of With The Band is one thick coat! I usually like to do two coats anyway, but with this one, if I did it would be too thick!


Above are some Essie polishes in my collection that are similar to With The Band, but not at all dupes. Double Breasted Jacket and She's Pampered (my most favorite red ever) lean more pink. Fishnet Stockings is more of a deep true blue toned red. Since With The Band is more orange I love it for Fall!!

I have been wearing so much plaid this year! Seriously, I wear it almost every day. There are several plaid designs I will be trying over the next few months, but I knew I wanted to start with the Buffalo Check. Probably my favorite plaid pattern. It's not perfect, but I still love it!


Click on the link below for my full length tutorial, you can go polished too!

*If you try any of these nail designs, use #gopolishednails in Instagram so I can see your designs!

-Go Polished

Saturday, November 7, 2015

My #10 Favorite Fall Polish for 2015...


I have tried several navy polishes and I always seem to go back to this one. Some are too metallic and some are so dark they look black. When I am in the mood for navy I want a creamy one that looks navy in any light and one that has a slight dusty tone. This polish is all of those things. 


Not to mention it is a one coater! I always like to apply two though. The swatch above is just one coat. First Mate is a thick polish that applies so nicely and doesn't flood your cuticles. It's one of those colors that doesn't look all that exciting in the bottle but, when you swatch it you are like..."Dang, now that's a pretty color". Warning: if you wear this polish you will stare at your nails all day long. :) 


Essie Bobbing for Baubles is a pretty deep grayed out dusty blue which looks much darker when on the nails. OPI I Saw, You Saw, We Saw, Warsaw is not quite a true blue, is much darker and less creamy than First Mate. I love all of these polishes but, when I really just want a straight up navy polish I always grab First Mate.


I love this quatrefoil design! It truly looks like a stencil but, you might be surprised to find that I created this design using only dotting tools. It really is so simple! Anyone can do it with a little practice. (By the way, I always practice new designs on paper or a paper plate before attempting them on my finger nails).


Click on the link below for the full length, easy to follow tutorial. Please make sure to give me thumbs up and subscribe to my channel. It would really help a girl out. :)

Nail Tutorial: Quatrefoil Nail Design
*If you recreate this design by following my tutorial, please use #gopolishednails in Instagram so I can see your nails!


-Go Polished


Wednesday, November 4, 2015

My #9 Favorite Fall Polish for 2015...


Purple Palazzo Pants was released this fall in the OPI Venice Collection. It has just the right balance of pink and purple. In low light it appears more purple and in brighter light it can appear more pink. While it might not be your "traditional" color for this time of year, I personally think it is just dusky enough to make it perfect for Fall. 


The formula is fantastic and is opaque in two thick coats or three thin coats. Depending on how heavy handed you are. It applies so nice and even. This swatch above is three coats. Gorgeous!


I originally thought it would be almost an exact dupe for either OPI Lucky Lucky Lavender or Essie Warm & Toasty Turtleneck, but as you can tell from the photo above, it isn't. Compared to Essie Go Ginza, Purple Palazzo Pants is much darker and slightly more purple. This definitely makes my purchase justifiable for sure. ;). Haha.


 The moment I saw this polish I knew I wanted to pair it with a deep plum purple! I decided on doing some half moons of OPI We'll Always Have Paris the base of the nails. I really love this color combination. What do you think?

Click on the link below for a full length tutorial for this look on my YouTube channel!


-Go Polished


Tuesday, October 27, 2015

Monster Mash Manicure Tutorial

Monster Mash Manicure


I really love the way this Monster Manicure turned out! And, it was so fun to do! I looked at several clip art monsters online for inspiration and drew out all the monsters so I would have a guide.  I also decided on the color for each monster and what monster I wanted on each nail.

Below are close-ups of each monster, and I couldn't help it, I had to name them and give them some personality! :)

A close up of Bob: a frightening spider monster who loves spending time searching the web.


A close-up of Blobby: a sweet spirited monster who is happiest when he's eating his ghoul scout cookies.


A close-up of Frank: You are right to be afraid of Frank. Frank's favorite foods are beans-human beans!


A close-up of Cyclo: an easy to talk to monster, although he might leave you feeling perplexed after your conversation. Was he winking at you or just blinking?...


A close-up of this green monster. You might be afraid of getting eaten by him, but believe me, he is more afraid of being eaten by YOU. His name is Boogie.


You can do a manicure with all the monsters together (like I did above), or you can choose your favorite accent monster and a coordinating color for your remaining nails. Like this...


Here are the supplies you will need for this design, with links to each one:


Base Coat-ORLY Bonder
White polish-OPI Alpine Snow
Black polish -OPI Black Onyx
Orange polish-OPI Where Did Suzi's Man-go?
Purple polish-OPI Do You Have This Color in Stockholm?
Red polish-OPI Big Apple Red
Green polish-OPI You Are So Outta Lime
Gray polish-China Glaze Intelligence, Integrity and Courage
Brushes-What's Up Nails Detail brushes #1 and #2
Dotting Tools
Pure Acetone
Clean-up brush-Sonia Kashuk no 105 smudge brush
Top coat-HK Girl Fast Dry Top Coat

Give these monsters a try! If you recreate this design please use #gopolishednails in Instagram so I can see your manicures! 

Here is the link to the tutorial:


-Go Polished


Monday, October 26, 2015

Dry Marble Flame Nail Design

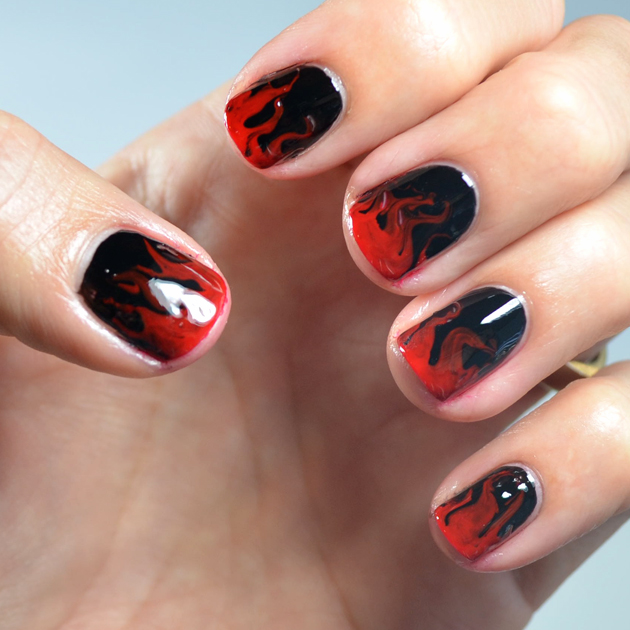
I love this Flaming nail design for Halloween!


I ended up really loving the colors I chose for this manicure, Essie Licorice and OPI Big Apple Red, mostly because in bright light the flames really stand out but, in low light the flames are more subtle and the manicure almost looks more like a gradient. Personally I love that! You can definitely use a brighter color though. Do whatever makes you the happy! :)


Here is what you will need to do this simple Dry Marble Technique.


Base Coat: ORLY Bonder
Black Polish: Essie Licorice
Red Polish: OPI Big Apple Red
A round toothpick
Clean-up Brush: Sonia Kashuk no. 105


Click on the link below for an easy to follow full length Tutorial!


-Go Polished


Friday, October 23, 2015

Spider and Web Nail Tutorial

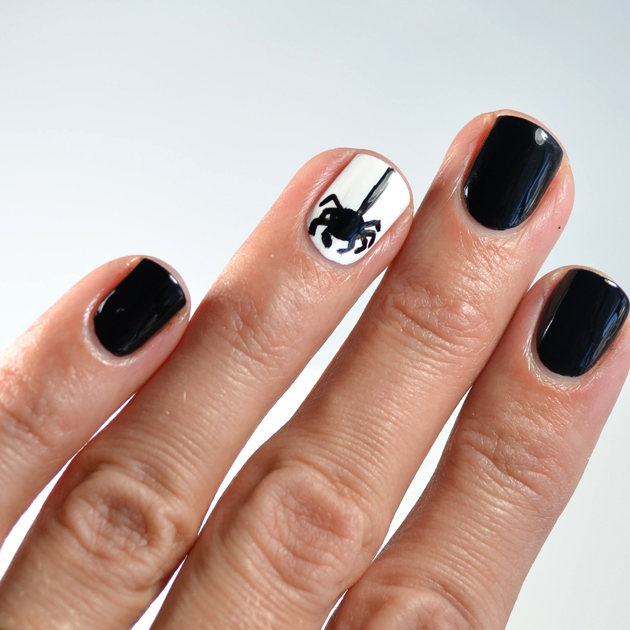
I saw spider nail designs by @kt_tk1 and @lacqaholic on Instagram and decided to combine the two ideas for this next Halloween nail design. You have two options with this design. You can have one spider accent nail with black on the remaining fingers for a more classic look like this one, or...


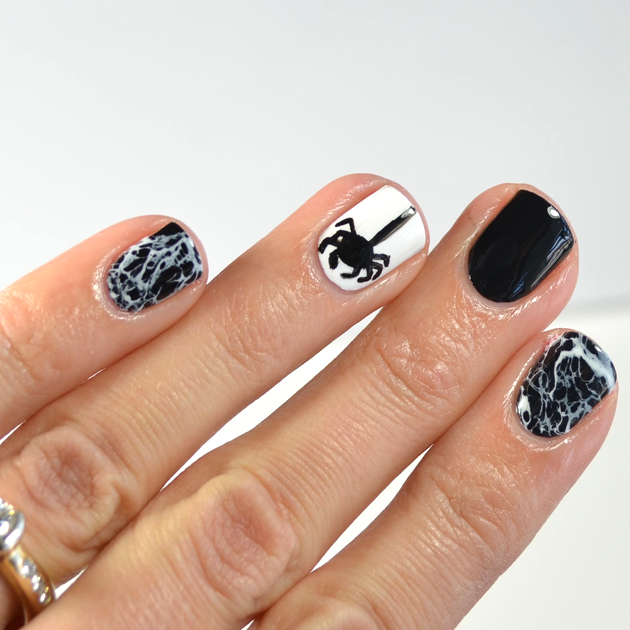
 ...you can make it a little more spooky by adding these awesome spider webs! So cool, right?!


Supplies you will need: A base coat (ORLY Bonder), a black (Essie Licorice) and white (OPI Alpine Snow) polish, distilled water, a small plastic cup, spritz hairspray, a fine detail paint brush (What's Up Nails detail brush #1), pure acetone, and a clean-up brush (Sonia Kashuk no. 105 smudge brush from Target). Liquid latex is optional, but it cuts down on the mess and makes for easy clean-up. (I just put mine in an empty nail polish bottle for easy application.)


Click on the link below for the tutorial!


-Go Polished


Wednesday, October 21, 2015

Fall Pumpkin Nail Tutorial

My 6 year old daughter came to me the other day with a green polish, a blue polish and an orange polish. She knew exactly what she wanted. She wanted grass, sky and pumpkins on her nails. I love that she thinks about these things :). So we sat down and came up with this-


She also said she wanted me to be a twinner with her. Is that even a word? Anyway, I came up with the manicure below. I love being twins with my daughter at times-even if it means I have to wear pumpkins on my nails. Not usually my thing being that I am, ahem, a little bit older ;), but I really like this design for you younger folks. :)


Here are the supplies you will need for this nail design. Base Coat (not pictured), cream, brown, orange, blue, green and red polishes. Acetone, a dotting tool and a small craft brush, and a fast dry top coat.

You can use any polish brand you would like but, I have to say there is something about these OPI colors! The formula on these allow them blend together seamlessly, and they have such a nice glow from within. Can't quite explain it, but they just work!


The specific supply list (with links for each product) is listed in the description bar of my tutorial. You can find the full tutorial below.


-Go Polished


Monday, October 19, 2015

Googly Eye Halloween Nail Tutorial

My most favorite Halloween nail design ever- GOOGLY EYEBALLS!!


So simple. So fun. So adorable. So classy. And, most importantly SO easy!

All you need is a good base coat, a black and white polish and a dotting tool (or a toothpick from home). You will also need some pure acetone (any brand will do) and a clean up brush to make it look nice and neat!

(The specific products I used as well as a link to each are listed in the description bar on my YouTube tutorial. Just click on the tutorial link below.)


Below is link to the full tutorial so you can GO POLISHED too!! Let me know how it works out for you! Ha! That rhymed :) I always feel like somebody's watching me...who's playing tricks on me. Sorry couldn't help myself!


-Go Polished


Friday, October 16, 2015

Candy Corn Nail Design

Since Halloween is approaching I wanted to do a few Halloween inspired nail designs. I am starting out with this candy corn design. I wanted it to be a little different than your standard candy corn manicure, and I have been loving negative space lately, so I decided to put them together. I also wanted to keep it pretty simple so it would be a design that I might actually wear and not feel like a 5 year old :). So, I decided on only a few candy corns with a classy white polish for the remaining nails. I tend to be pretty conservative when it comes to polish, although I am starting to branch out a little. :)


Here are the materials you will need for this design:

A good base coat, a yellow, orange and white polish, a fast drying top coat, nail stickers, acetone and good clean-up brush.


Here are the specific products I used with links :)-

The base coat I am loving right now is ORLY Bonder.
Straight Skinny Tape is from What's Up Nails. There are many different places you can get nail stickers, you don't have to specifically use What's Up Nails (although they are fantastic). You can find stripping stickers at Sally's, Walmart and sometimes Target. If they are thicker than I want I usually just cut them to the size I like. You could even cut and use strips of tape from home. Just always make sure your polish is completely dry.
Pure Acetone for Clean-up: Any brand
Smudge brush for Clean-up: Sonia Kashuk No. 105 smudge brush
Top Coat: imn Out The Door fast dry top coat.

Here is the tutorial!! Check it out!


Over the next few weeks leading up to Halloween, I will be sharing more Halloween inspired nail designs! So, stay tuned!


-Go Polished